Best DIY Home Renovation Hacks
Best DIY Home Renovation Hacks: Transforming Your Space on a Budget
1. Revamp Kitchen Cabinets with Contact Paper:
Forget expensive cabinet replacements. Contact paper offers a remarkably affordable and versatile solution for breathing new life into your kitchen. This self-adhesive vinyl comes in a vast array of colors, patterns, and even realistic wood and marble textures.
- Prep is Paramount: Thoroughly clean cabinet surfaces with degreaser and remove all hardware. Sand lightly if the existing finish is glossy.
- Precise Measurements: Accurately measure each cabinet surface and cut the contact paper slightly larger, allowing for adjustments.
- Application Technique: Peel back a small section of the backing paper and carefully align the contact paper with one edge. Use a smoothing tool (a credit card wrapped in fabric works well) to gradually adhere the paper, working from the center outwards and eliminating air bubbles. Trim any excess with a sharp utility knife.
- Hardware Upgrade: Replacing old cabinet knobs and pulls is a simple yet impactful way to complement your newly covered cabinets. Consider brushed nickel, matte black, or even vintage-inspired hardware for a customized look.
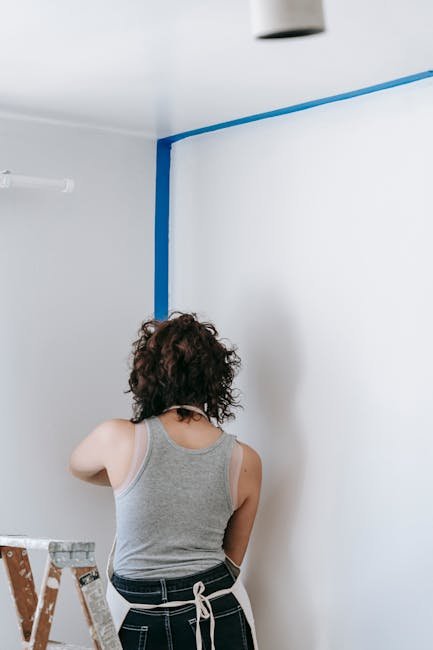
2. Paint Power: The Easiest Room Transformation:
A fresh coat of paint is arguably the most impactful and budget-friendly DIY renovation you can undertake. But don’t underestimate the preparation involved.
- Surface Preparation: Clean walls with a mild detergent and water to remove dirt and grease. Fill any holes or cracks with spackle and sand smooth. Prime bare walls or walls with stains.
- Choosing the Right Paint: Select the appropriate paint sheen for each room. Matte paint is ideal for low-traffic areas and hides imperfections, while eggshell or satin finishes are more durable and easier to clean, perfect for hallways and living rooms. Semi-gloss or gloss paint is best for kitchens and bathrooms, offering the highest moisture resistance.
- Taping Techniques: Use high-quality painter’s tape to protect trim, windows, and ceilings. Ensure the tape is firmly adhered for crisp, clean lines.
- Cutting In: Use a small angled brush to “cut in” around the edges of the room before rolling. This creates a professional-looking finish.
- Rolling Technique: Use a roller with the appropriate nap length for your wall texture. Apply paint in a “W” pattern and then fill in the gaps for even coverage.
3. Embrace Open Shelving for Kitchen Storage:
Ditch bulky upper cabinets and create a more open and airy feel in your kitchen with DIY open shelving.
- Shelf Material Selection: Choose materials that complement your kitchen’s style, such as reclaimed wood, solid wood planks, or even metal shelving.
- Proper Support: Ensure your shelves are adequately supported. Use heavy-duty shelf brackets that are securely anchored to wall studs.
- Strategic Placement: Plan the placement of your shelves carefully, considering the items you’ll be storing. Place frequently used items within easy reach.
- Styling Tips: Arrange items aesthetically by grouping similar objects, incorporating decorative elements, and using varying heights. Consider adding plants or artwork for visual interest.
4. Upgrade Bathroom Fixtures for a Spa-Like Feel:
Replacing outdated bathroom fixtures can drastically improve the look and feel of your bathroom without breaking the bank.
- Faucet Replacement: Replacing a faucet is a relatively simple DIY project. Ensure you turn off the water supply before disconnecting the old faucet. Choose a faucet that matches your bathroom’s style and has the features you need.
- Showerhead Upgrade: A new showerhead can transform your showering experience. Consider a rain showerhead, a handheld showerhead, or a dual showerhead system.
- Toilet Seat Swap: A new toilet seat is an inexpensive way to freshen up your bathroom. Choose a comfortable and stylish option that complements your bathroom decor.
- Mirror Magic: Replacing a dated mirror with a larger, more modern mirror can instantly brighten and enlarge your bathroom.
5. Reimagine Furniture with Paint and Upholstery:
Don’t discard old furniture – give it a new lease on life with paint and upholstery.
- Painting Furniture: Prepare furniture by sanding and priming. Choose a paint that is suitable for furniture, such as chalk paint or latex paint. Apply several thin coats for a smooth, even finish. Consider distressing the paint for a vintage look.
- Simple Upholstery Projects: Reupholstering a chair seat or bench is a manageable DIY project. Remove the old fabric, add new batting if needed, and then staple new fabric securely to the frame.
- Drawer Liner Upgrade: Add personality to your drawers by lining them with decorative paper or fabric. Cut the material to size and adhere it with double-sided tape.
6. Create a Feature Wall with Texture or Wallpaper:
A feature wall can add visual interest and personality to any room.
- Textured Paint Techniques: Explore different textured paint techniques, such as sponging, stippling, or rag rolling, to create a unique wall finish.
- Wallpaper Wonders: Wallpaper offers a wide range of patterns and textures. Choose a wallpaper that complements your room’s style and color scheme. Consider peel-and-stick wallpaper for easier application.
- Board and Batten: This classic wall treatment adds architectural detail and dimension. Install vertical boards spaced evenly apart and then add horizontal boards at the top and bottom.
- Shiplap Chic: Shiplap is a popular option for creating a rustic or coastal look. Install horizontal planks of wood on the wall, leaving a small gap between each plank.
7. Upcycle and Repurpose Existing Materials:
Get creative and repurpose existing materials to create unique home decor items.
- Pallet Projects: Pallets can be transformed into furniture, wall art, or even garden planters.
- Mason Jar Magic: Mason jars can be used for storage, lighting, or decorative accents.
- Old Book Decor: Turn old books into decorative stacks, bookends, or even hidden storage compartments.
- Repurposed Ladders: Old ladders can be used as shelving units, towel racks, or even decorative displays.
8. Add Curb Appeal with Simple Landscaping:
Enhance your home’s curb appeal without extensive landscaping renovations.
- Power Washing: Power washing your siding, driveway, and walkways can instantly brighten your home’s exterior.
- Planting Flowers: Add colorful flowers in pots or flower beds to create a welcoming entrance.
- Mulching: Mulch helps retain moisture, suppress weeds, and adds a finished look to your garden beds.
- Lawn Care: Regular lawn mowing, fertilizing, and weed control will keep your lawn looking healthy and vibrant.
9. Install Under-Cabinet Lighting in the Kitchen:
Illuminate your kitchen countertops and workspaces with easy-to-install under-cabinet lighting.
- LED Strip Lights: LED strip lights are energy-efficient, easy to install, and come in a variety of colors and brightness levels.
- Puck Lights: Puck lights are small, discreet lights that can be easily mounted under cabinets.
- Plug-in Options: Choose plug-in under-cabinet lights for a simple, no-wiring installation.
10. Update Window Treatments for a Fresh Look:
Window treatments can significantly impact a room’s style and ambiance.
- DIY Curtains: Sew your own curtains using inexpensive fabric or repurpose old sheets or tablecloths.
- Roman Shades: Roman shades offer a clean and modern look. You can DIY them using fabric and dowels.
- Blinds and Shades: Choose blinds or shades that complement your room’s style and provide the desired level of light control and privacy.